Loading and Saving Images
First thing we are going to do is load an image:
>>> logo = Image("simplecv")
That line of code will load the SimpleCV logo into memory. Now we want to see it:
>>> logo.show()
What you should see is:
Now let’s save the logo:
>>> logo.save("my-image.png")
That saved the image to disc in the same directory you started python from you can always type:
>>> pwd
'/home/xamox/Code/simplecv-examples'
That was the “print working directory” command. You should be able to navigate to that location on your computer and see a file called my-image.png.
You can also specify saving images such as:
>>> logo.save("path/to/img.png")
To load an image, specify the file path in the constructor: >>> my_image = Image(“path/to/image.jpg”)
Getting an Image from the Camera As long as your camera driver is supported then you shouldn’t have a problem. This means you should be able to open your webcam software in other software it should more than likely work with SimpleCV.
To load the camera just type:
>>> cam = Camera()
Then to grab an image from the Camera we type:
>>> img = cam.getImage()
We now have an image loaded into memory and just as before if we want to display it, we just type:
>>> img.show()
You can also save it, etc. Note: There is a list of supported web cams on the wiki.
You can once again run help if you don’t know what to do with that image.
>>> help cam
This will output:
Help on instance of Camera in module SimpleCV.Camera:

class Camera(FrameSource)
        The Camera class is the class for managing input from a basic camera.  Note
        that once the camera is initialized, it will be locked from being used
        by other processes.  You can check manually if you have compatable devices
        on linux by looking for /dev/video* devices.
Note: Remember to type ‘q’ to quit the interactive help mode in the SimpleCV shell.
Image Manipulation
Now that we can easily load and save images. It’s time to start doing some image processing with them. Let’s make our picture a thumbnail:
>>> thumbnail = img.scale(90,90)
>>> thumbnail.show()
This will show a scaled down version of the image.
Now let’s erode the picture some:
>>> eroded = img.erode()
>>> eroded.show()
It should look almost as the picture was made of ink and had water spilled on it. Let’s crop a section of the image out:
>>> cropped = img.crop(100,100,50,50)
>>> cropped.show()
What that did is went from the coordinate in (X,Y), which is (0,0) and is the top left corner of the picture. We basically said move to coordinates (100,100) in the (X,Y) and crop a picture from that which is 50 pixels by 50 pixels. Now you maybe asking how are you suppose to know what parameters to put into the crop() function, or even that the crop function exist. Well remember good old help? It also works for functions. So since image is an Image, than you can type ‘help img’, and get the help for that. To learn what crop needs as input.
>>> help img.crop
This will output:
Help on method crop in module SimpleCV.ImageClass:

crop(self, x, y=None, w=None, h=None, centered=False) method of SimpleCV.ImageClass.Image instance
                Crop attempts to use the x and y position variables and the w and h width
                and height variables to crop the image. When centered is false, x and y
                define the top and left of the cropped rectangle. When centered is true
                the function uses x and y as the centroid of the cropped region.
Features
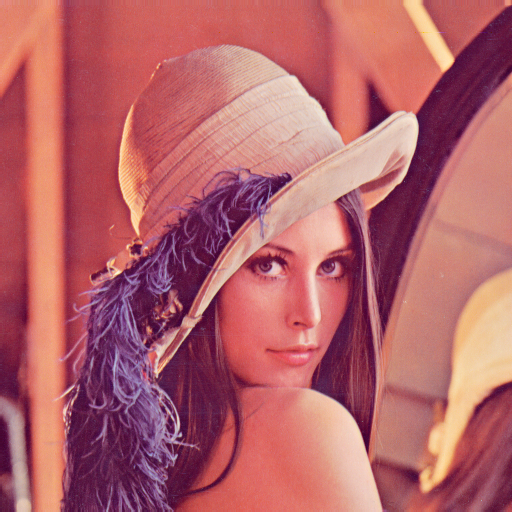
Features are things you are looking for in the picture. They can be blobs, corners, lines, etc. Features are sometimes referred to as a fidicual in computer vision. These features are something that is measureable, and something that makes images unique. Features are something like when comparing things like fruit. In this case our features could be the shape and the color, amongst others. What features are in SimpleCV is an abstract representation of that. You take your image, then perform a function on it, and get back features or another image with them applied. The crop example is a case where an image is returned after we perform something to do. In a simple example we will use the famous “lenna” image, and find corners in the picture.
>>> img = Image("lenna")
>>> img.findCorners()
Which should give you an output like:
<SimpleCV.Features.Detection.Corner object at 0x3d5f950>,
<SimpleCV.Features.Detection.Corner object at 0x3d5f990>,
<SimpleCV.Features.Detection.Corner object at 0x3d5f9d0>,
<SimpleCV.Features.Detection.Corner object at 0x3d5fa10>,
<SimpleCV.Features.Detection.Corner object at 0x3d5fa50>]
This means we found blobs, but we didn’t store that information anywhere. What is happening is it is “returning” the blobs. So to do that we just use:
>>> img = Image("lenna")
>>> blobs = img.findBlobs()
>>> img.show()
Well, this time nothing will be printed as instead of the return it gets stored in the variable ‘blobs’. But when we show the image we haven’t noticed anything different to the image. Well this is because we have to actually tell the blobs to draw themselves on the image.
>>> img = Image("lenna")
>>> blobs = img.findBlobs()
>>> blobs.draw()
>>> img.show()
The image should have went from this:
Now you should get an image close to the following:
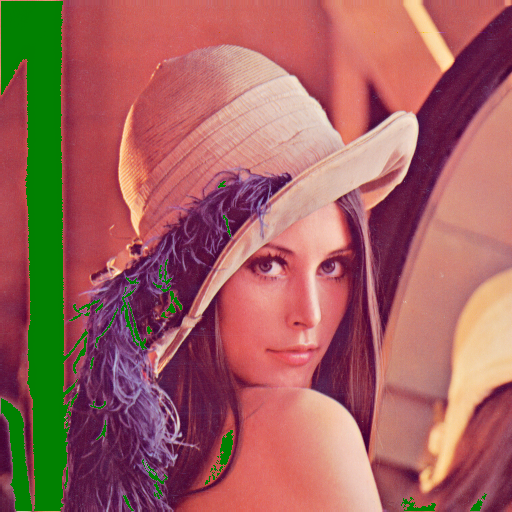
You will see the green blobs filled in. There is also a little trick built into SimpleCV to do this even faster:
>>> img = Image("lenna")
>>> img.findBlobs().show()
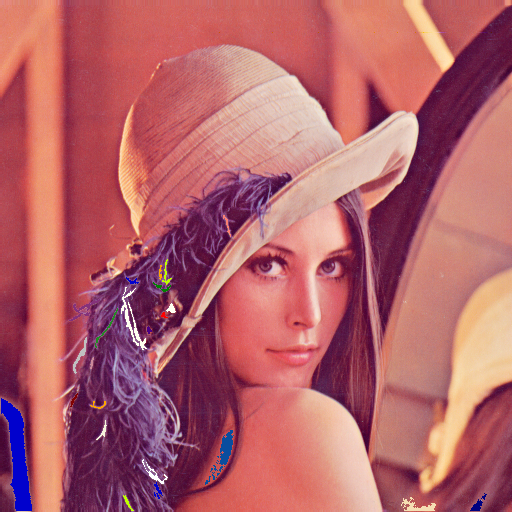
That’s it. It should automatically draw the green on the blobs as well. But you may notice that it’s all green, and maybe we want to see all the blobs separately. Easy.
>>> img = Image("lenna")
>>> img.findBlobs().show(autocolor=True)
Then you should get an image more like this:
Color
Did you notice in the previous example how we could change the color when we draw? Well there are times when we want to detect color as well. This is represented in SimpleCV as an object. Why? Well typically color is used in the common format Red-Green-Blue (RGB). This can also be represented as as ‘tuple’ in SimpleCV like (R,G,B). Each of those color channels have a value between 0 and 255. So the color black is: (0,0,0), the color white is (255,255,255). As you can imagine the RGB for the color Red is the red channel all the way up and the others with no value. So red is (255,0,0). But, this would get hard to remember after time, or for instance, how do you make orange? Well orange is red and yellow mixed, but what would the tuple be? Luckily SimpleCV has tried to make this much easier with built in maps for these tuple values. To confirm this just type:
>>> Color.BLACK
>>> (0,0,0)
As you can see the color define is basically a map to that tuple color, but just makes it easier for us to remember. You can also get the list of colors by using the help command:
>>> help Color
You should get an output similiar to:
Help on class Color in module SimpleCV.Color:
class Color
        Color is a class that stores commonly used colors in a simple
        and easy to remember format, instead of requiring you to remember
        a colors specific RGB value.

        To use the color in your code you type:
        Color.RED

        To use Red, for instance if you want to do a line.draw(Color.RED)

        Methods defined here:

        getRandom(self)
                Returns a random color in tuple format

        ----------------------------------------------------------------------
        Data and other attributes defined here:

        AQUAMARINE = (127, 255, 212)

        AZURE = (0, 127, 255)
        .
        .
        .
        more
ColorCurve is a color spline class for performing color correction. It can take as parameters a SciPy Univariate spline, or an array with at least 4 point pairs. Either of these must map in a 255x255 space. The curve can then be used in the applyRGBCurve, applyHSVCurve, and applyInstensityCurve functions:
>>> img = Image("lenna")
>>> clr = ColorCurve([[0,0], [100, 120], [180, 230], [255, 255]])
>>> img.applyIntensityCurve(clr)
A color map takes a start and end point in 3D space and lets you map a range of values to it. Using the colormap like an array gives you the mapped color. This is useful for color coding elements by an attribute:
>>> blobs = image.findBlobs()
>>> cm = ColorMap(color = Color.RED, startmap = min(blobs.area()) , endmap = max(blobs.area()))
>>> for b in blobs:
        b.draw(cm[b.area()])